Plenty of small apartment kitchens have no pantry at all. The food still needs a home, and when it ends up scattered across three cabinets, a drawer and the top of the fridge, cooking gets slower and half the groceries get forgotten.
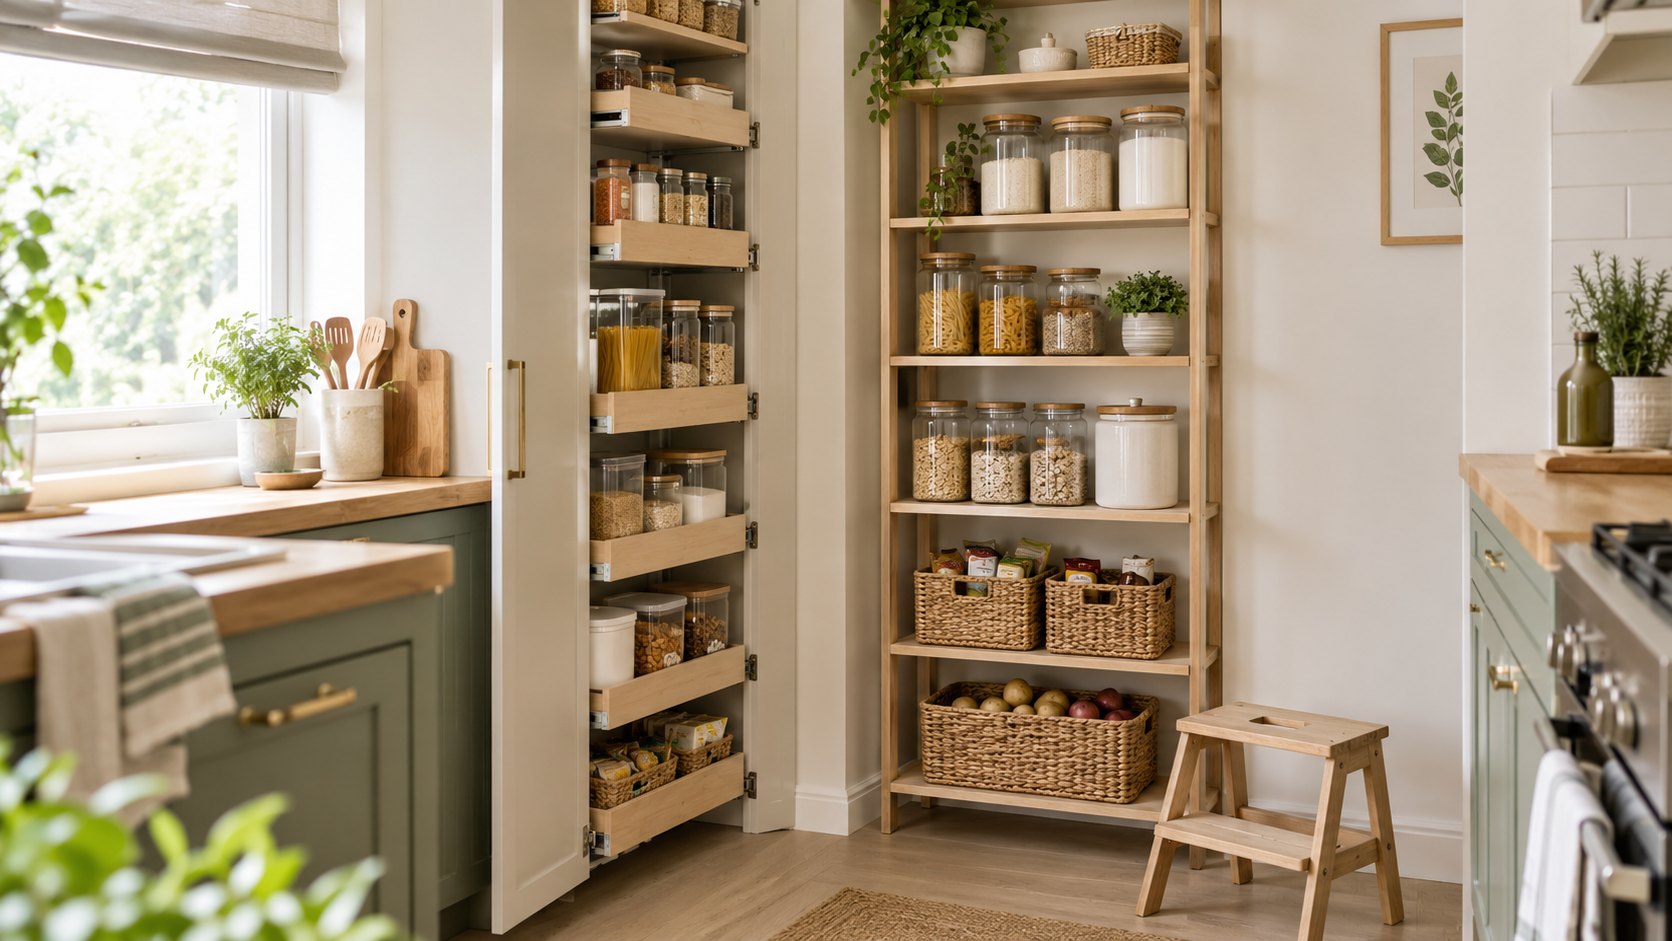
This guide shows how to build a compact pantry zone for dry goods in a kitchen that has none. You have two realistic options, both visible in the cover photo: a tall, narrow cabinet with pull-out shelves, or a slim open shelf unit. We compare them, set shelf heights by how easily you can reach them, choose containers and labels, and finish with a simple rotation and pest routine. For the rest of the kitchen, see our guides to kitchen zones, aisles and cabinets and renter-friendly kitchen storage .
What a Pantry Zone Has to Do
Whatever you build, it has to do five jobs: keep food dry, cool and dark; show you everything at a glance; put the daily items within easy reach; make rotation automatic; and keep pests out.
Texas A&M AgriLife Extension describes pantry conditions as dry, cool and dark, ideally 50 to 70 degrees Fahrenheit, and advises keeping stored food in cabinets away from the range, oven, water heater, dishwasher and hot pipes. Those two lines decide where the zone can go, more than any product does. The most convenient spot in a small kitchen is often the wrong one: a tall cabinet next to the oven or a shelf unit beside the dishwasher works against the 50 to 70 degree goal. Look for a wall segment, a corner or a stretch near the entrance that stays away from heat.
Step 1: Count What You Actually Store
Before choosing furniture, empty every cabinet that holds dry food and sort it into piles: grains and pasta, baking supplies, canned goods and jars, cereal and snacks, oils and sauces, and produce that lives outside the fridge, such as onions and potatoes. Most kitchens that feel out of space are really holding duplicates, stale packages and half-used bags.
Edit first. Throw out anything expired or stale, combine duplicate open packages and set aside what you do not eat. Then count the piles. Each pile becomes one shelf level, one pull-out tray or one basket, and that count tells you how many levels the unit needs far better than a guess in the store.
Texas A&M’s guide also suggests buying only what you expect to use within the recommended storage times. In a kitchen without a pantry, that habit is the cheapest storage upgrade there is.
Where Dry Food Should Not Live
Some spots are tempting because they are empty, but they are wrong for food:
- Under the sink. Texas A&M specifically calls this a poor place for potatoes and onions, and the same logic applies to boxes of pasta and bags of flour.
- Beside or above the range, oven or dishwasher. Heat and steam are the opposite of cool and dry.
- A sunny window ledge. Texas A&M advises keeping stored food away from light and heat as much as possible.
- The top of the refrigerator. It is usually warm and awkward to reach, so food ends up forgotten there.
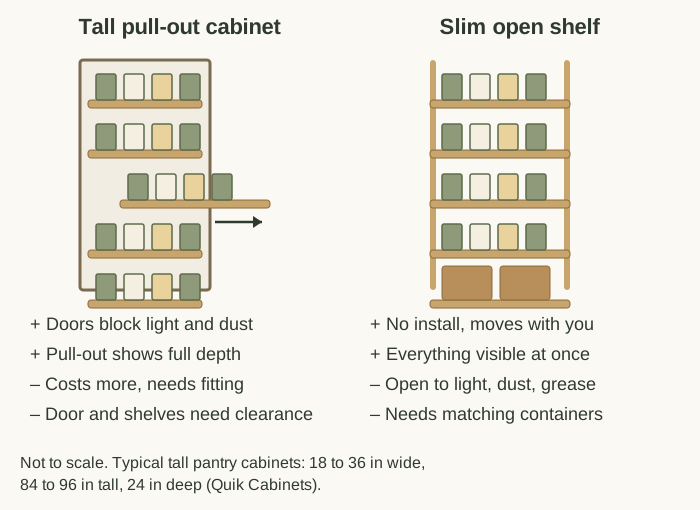
Option 1: A Tall Narrow Cabinet With Pull-Out Shelves
This is the closest thing to a real pantry in a footprint a narrow kitchen can spare. Quik Cabinets lists standard utility pantry cabinets at 18 to 36 inches wide, 84 to 96 inches tall and 24 inches deep, so even the 18 inch version uses wall height that most kitchens waste while taking less floor space than a standard dishwasher.
The pull-out shelves are the point. Instead of reaching into a 24 inch deep cavity and losing a jar at the back, you slide the whole shelf out and see every container from above.
What it does well:
- The doors close, so food stays dark and protected from dust and cooking grease.
- Full-extension shelves show everything and make rotation easy.
- It turns a narrow gap beside the refrigerator or at the end of a run into serious storage.
What to check before you buy:
- Cost and fitting. A built-in unit needs installation, which is rarely possible in a rental. A freestanding tall cabinet, or a slide-out kit that fits inside an existing base cabinet, is the renter route.
- Clearance. The door and the extended shelves must clear the neighboring appliance and the opposite counter. Check your aisle first; our galley kitchen guide has the work-aisle numbers.
- Load rating. A shelf of jars full of rice is heavy. Read the slide manufacturer’s load rating and do not exceed it.
- Fixed spacing. Shelf heights are set in advance, so measure your tallest container before you buy.
Option 2: A Slim Open Shelf Unit
A narrow open shelf unit, shown on the right of the cover photo, is the no-install option. A unit around 12 to 16 inches deep (a planning example, not a standard) keeps containers one row deep so nothing hides at the back, and it can move with you when your lease ends.
What it does well:
- No installation, so it works in a rental.
- Everything is visible, which means you use what you already have.
- It usually costs less, and many models have adjustable shelves.
What to watch:
- It is open. Light, dust and cooking grease reach the food, so keep it out of the cooking zone and put everything in closed containers.
- Looks matter more. Without doors, mismatched packages read as clutter, so matching containers do real work here.
- Tipping. A tall, narrow unit loaded with food can tip. Use the anti-tip hardware it comes with, and ask your landlord about a single wall anchor point.
Which One Should You Choose?
Choose the pull-out cabinet if you own the space or can fit it, your kitchen collects dust and grease, or you want the closest thing to a real pantry. Choose the open shelf if you rent, want to take it with you later or have a tight budget. Many small kitchens end up with both: a narrow cabinet for the daily jars and an open shelf for baskets and bulk items.
Set Shelf Heights by Reach
The diagram below sorts the shelves into three zones. The US ADA Standards describe an unobstructed forward reach of 15 to 48 inches above the floor. Your kitchen does not have to meet that rule, but it is a handy comfort guide for deciding what goes where.
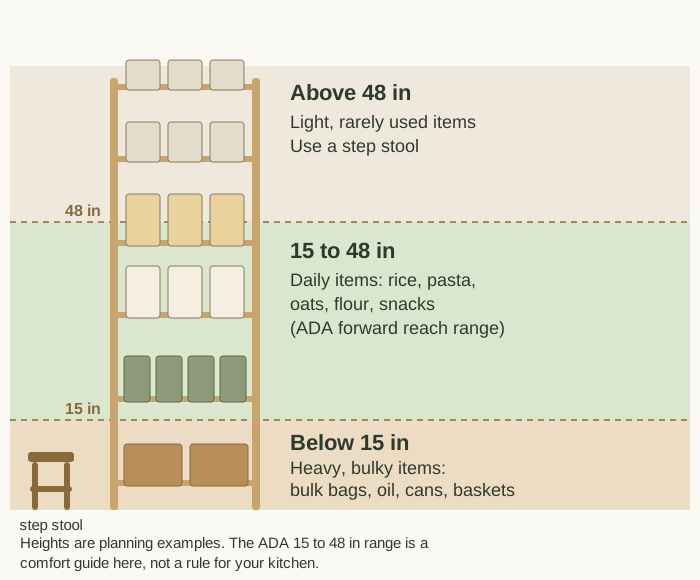
- Below 15 inches: heavy and bulky. Bulk bags, bottles of oil, canned goods and produce baskets. Lifting heavy things from low is easier than from above shoulder height.
- 15 to 48 inches: daily items. Decanted rice, pasta, oats, flour, baking basics and the snacks you reach for several times a week.
- Above 48 inches: light and rarely used. Backup cereal, baking extras and occasional items. Keep a small step stool beside the unit, as in the cover photo, and never climb on a chair or the counter.
Choose Containers, Then Label Them
Once the furniture is set, decant. UConn Extension recommends storing dry foods in clean glass or metal containers with tight-fitting lids, and cleaning the containers thoroughly before you refill them with fresh food. Texas A&M’s storage guide recommends dating food storage containers, which works just as well for a decanted bag of flour.
- Pick two or three sizes only. A large size for flour and rice, a medium for pasta and oats, a small for sugar, lentils and snacks. Matching sizes stack, line up and make shelf spacing predictable.
- Prefer square or rectangular. They waste less shelf space than round ones.
- Choose wide mouths. You need to fit a scoop or a measuring cup.
- Label the item and the date. Tape the cooking instructions inside the lid or photograph the package before you recycle it.
- Leave sealed cans and jars alone. Not everything has to be decanted.
Keep Pests Out
UConn Extension explains that pantry pests arrive in infested food packages and spread to susceptible products such as grains, flour, cereal, nuts, dried fruit and pasta. A few habits cover most of the risk:
- Inspect new purchases. Check flour, cereal and bulk grains when you bring them home.
- Use lids that really seal. UConn warns that a container with a loose lid can let pests escape and spread to neighboring food.
- Clean the shelves regularly. UConn notes that many pantry pests breed in food particles that spill or sift from packages and collect in cracks and corners. Texas A&M also advises cleaning the pantry periodically to remove food particles.
- Freeze, do not spray. UConn says lightly infested packages can be put in the freezer compartment for two or three days, and that insecticides are not recommended for pantry pests.
First In, First Out Without Thinking
Rotation is easier to build into the layout than to remember. Clemson’s Home & Garden Information Center states the rule plainly: use the oldest products first, and place newly purchased products behind the same products already on the shelf.
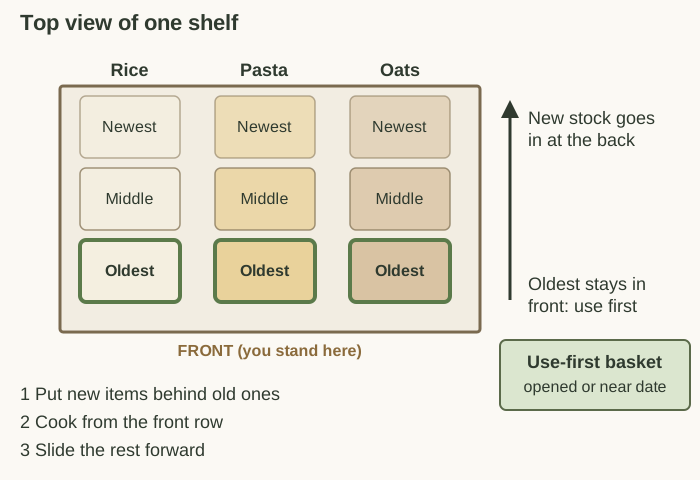
On a pull-out tray or a one-row open shelf, that means new containers go to the back, the front is always the oldest, and a small use-first basket holds opened packages and anything near its date.
Clemson’s pantry chart lists rice at one year, brown rice at six months and pasta at one to two years, which is a good reason to put a date on every container. These are quality guidelines: Clemson notes that pantry foods may stay safe past the recommended time, but flavor, texture and nutritive value decline.
Baskets for Onions and Potatoes
The cover photo shows woven baskets holding potatoes and snacks. Baskets suit produce because they let air move, but the temperature caveat matters. Clemson’s chart lists potatoes at one to three months at 45 to 50°F, and only about a week at room temperature, while onions keep one to three months at room temperature or below.
In a warm kitchen, that means a basket holds this week’s potatoes, not a month’s supply. Buy small amounts, keep the basket away from the range and sink, and check it weekly for soft spots.
A 45-Minute Setup
These times are planning estimates, not measurements.
- Empty and sort (15 minutes). Pull everything out and make the category piles.
- Edit and wipe (10 minutes). Discard expired items, wipe the shelves and let them dry.
- Place the unit (5 minutes). Put it away from heat, with room for doors or drawers to open.
- Decant and label (10 minutes). Fill the containers, add the item and date, and tape on the cooking instructions.
- Fill by zone (5 minutes). Heavy items low, daily items at reach, light items high. Add the use-first basket and the step stool.
Mistakes to Avoid
- Buying containers before measuring. Measure shelf height, depth and your tallest package first.
- Mixing many sizes. It wastes shelf height and makes the zone look messy within a week.
- Packing every inch. Leave a finger’s width around each container so it slides out easily.
- Putting new stock in front. The oldest food gets forgotten and expires.
- Placing the zone next to heat. It undoes the 50 to 70 degree goal.
- Skipping the date. Without a date, a decanted bag of flour has no history.
Try This Tonight
Set a 15 minute timer, empty one cabinet and sort the contents into category piles. Count the piles, write the number on a sticky note and measure the tallest container. That is all you need to decide between a pull-out cabinet and an open shelf this weekend.
Frequently Asked Questions
Can I use a regular kitchen cabinet as a pantry?
Yes, if it is away from the range, oven, dishwasher and water heater and you can see everything in it. Texas A&M AgriLife Extension advises storing food in cool, dry, dark cabinets away from heat sources. Add pull-out trays or low baskets so nothing gets lost at the back.
How tall and wide is a standard pantry cabinet?
Quik Cabinets lists utility pantry cabinets at 18 to 36 inches wide, 84, 90 or 96 inches tall and 24 inches deep. A narrow 18 inch version takes less floor space than a standard dishwasher. In a rental, a freestanding cabinet or a slide-out kit inside an existing cabinet is usually easier than a built-in unit.
What temperature should dry food be stored at?
Texas A&M AgriLife Extension describes pantry conditions as dry, cool and dark, ideally 50 to 70 degrees Fahrenheit. In a small kitchen that means keeping the storage zone away from the stove, oven, dishwasher and sunny windows.
Do I have to take food out of its original packaging?
Not for sealed cans and jars. For opened flour, rice, pasta, oats and similar dry foods, UConn Extension recommends clean glass or metal containers with tight-fitting lids. Date each container, and keep the cooking instructions on the lid or in a photo.
What should I do if I find pantry pests?
UConn Extension says insecticides are not recommended for pantry pests. Check nearby dry foods, put lightly infested packages in the freezer for two or three days, and clean the shelves, because spilled food particles in cracks and corners let the insects breed.
How do I store potatoes and onions without a pantry?
Use an open basket so air can move, buy small amounts and keep it away from the range and sink. Clemson’s pantry chart lists potatoes at 1 to 3 months at 45 to 50°F but only about a week at room temperature, so treat a basket in a warm kitchen as this week’s supply.
Related Kitchen Guides
For the rest of a small kitchen, see our guides to kitchen zones, aisles and cabinets , a pull-out spice rack for a narrow galley , magnetic spice storage that needs no drilling and small apartment storage .
Sources
- Texas A&M AgriLife Extension: Safe Home Food Storage (PDF) : pantry conditions dry, cool and dark at about 50 to 70°F, cabinets away from the range, oven, dishwasher and hot pipes, no under-the-sink storage for potatoes and onions, cleaning the pantry, dating containers, buying only what you will use.
- UConn Extension: Pantry Pests and Their Control : clean glass or metal containers with tight-fitting lids, loose lids letting pests escape, freezing lightly infested packages for two or three days, spilled food in cracks, no insecticides.
- Clemson Home & Garden Information Center: Food Storage: Pantry : first in, first out with new products placed behind older ones, storage times for rice, brown rice, pasta, potatoes and onions.
- US Access Board: ADA Chapter 3, Operable Parts : the 15 to 48 inch unobstructed forward reach range.
- Quik Cabinets: Kitchen Cabinet Sizes, Complete Guide to Standard Dimensions : utility pantry cabinets 18 to 36 inches wide, 84 to 96 inches tall and 24 inches deep.
The diagrams are original illustrations made for this guide; the sizes and times are planning examples. Always check your own measurements and follow the manufacturer’s specifications for cabinets, slides and shelf units.
Image Credits
- Cover: AI-generated image via ChatGPT, October 2026.