Quick answer: protect the aisle first, then put a pull-out spice tray in a base cabinet that is two doors away from the range, sized to the real cabinet and the slide hardware, and keep the daily jars at the front. Everything else in a galley works better once the walkway is clear.
What “Galley” and “5 Feet” Really Mean
A galley kitchen has two parallel runs of cabinets and a narrow aisle between them. The numbers matter, because many small kitchens are called “five-foot galleys” without anyone checking the arithmetic. Two standard base cabinets are each 24 inches deep, so two runs take 48 inches. In a room that is exactly five feet (60 inches) wide, that leaves only 12 inches to walk, which is not a kitchen.
A realistic galley is wider. The National Kitchen & Bath Association recommends a work aisle of at least 42 inches for one cook and at least 48 inches for more than one cook, measured between counter frontage, tall cabinets and appliances. Add the two 24-inch runs and you get about 90 to 96 inches, roughly 7.5 to 8 feet wall to wall. If your kitchen is closer to five feet wide, you probably have one cabinet run or shallow cabinets, so measure your own room before you copy any figure in this guide.
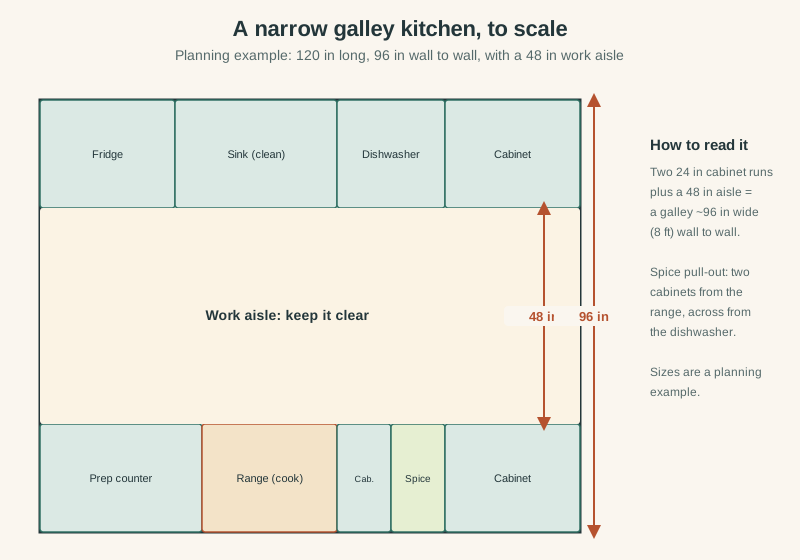
The plan above is a planning example, not a code requirement. NKBA’s figures are design guidelines, and local codes may apply.
Keep the Aisle Clear Before You Add Storage
Every inch you add to the cabinets comes out of the aisle, so the aisle is the first thing to protect. NKBA’s guidelines put the minimum walkway at 36 inches, and the work aisle at 42 to 48 inches. If you are below those numbers, adding more storage will not help; removing things from the floor will.
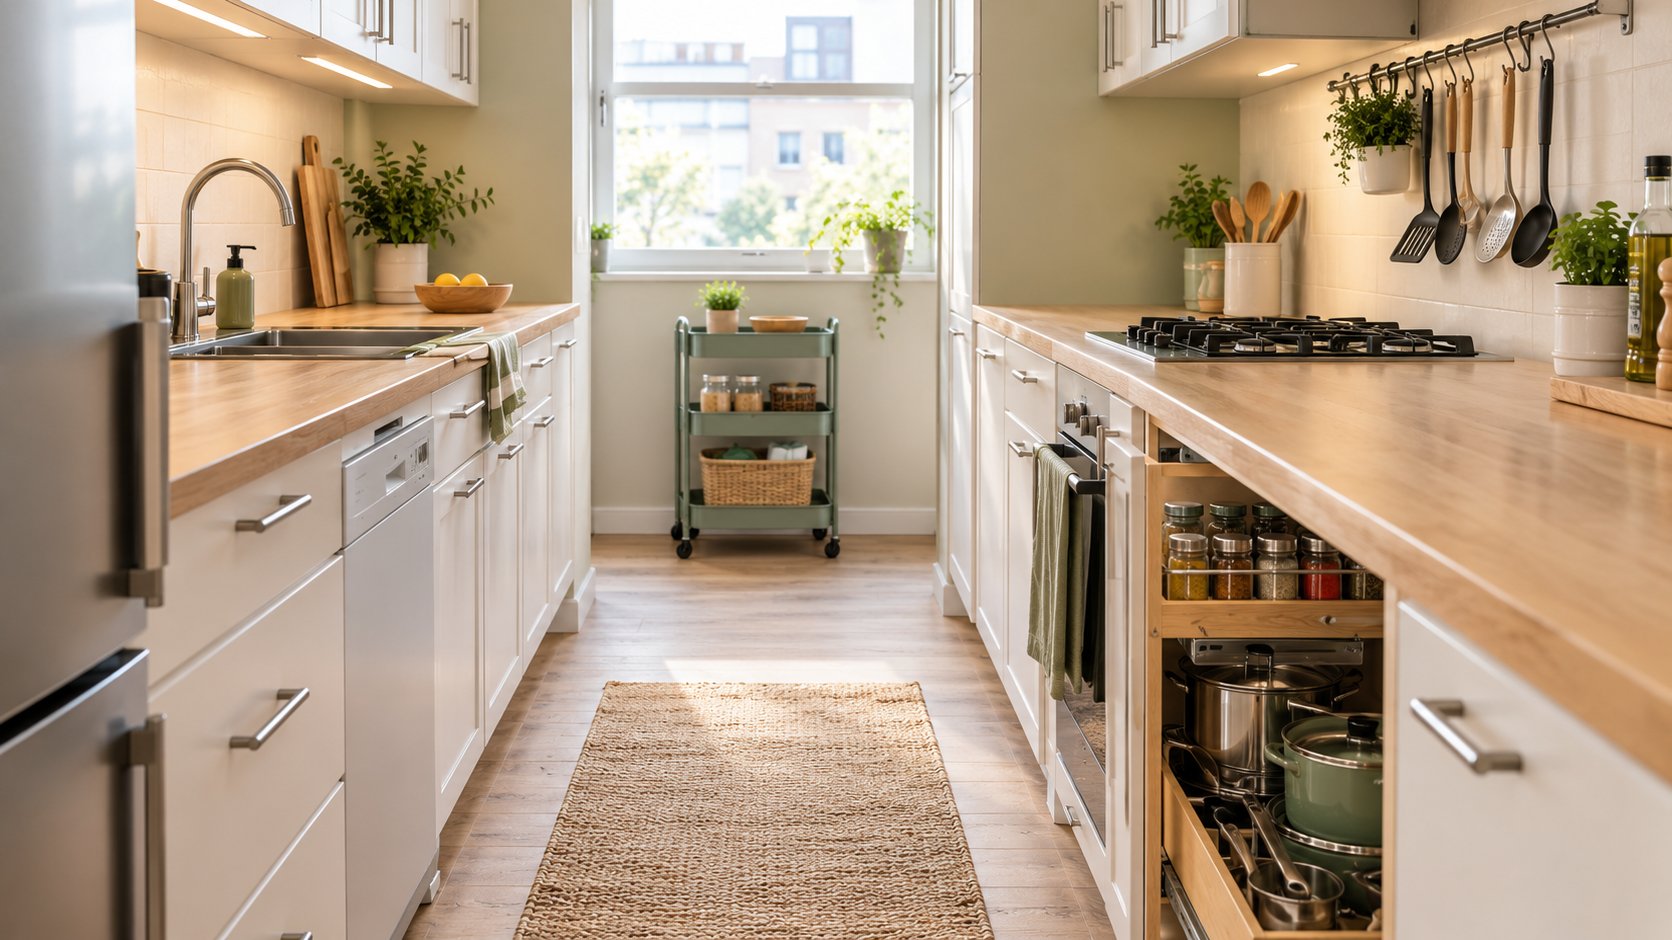
Keep appliances, bins and step stools out of the aisle when you cook. A rolling cart works at the end of a galley, as the cover photo shows, but only where it leaves the walkway open. If you use a runner, give it a non-slip pad so it cannot curl or slide under your feet.
Choose a Cabinet That Will Not Cook Your Spices
Spices lose flavor and clump when they are exposed to heat, light and moisture. University of California Cooperative Extension advises against storing herbs and spices above the stove, dishwasher, microwave or refrigerator, or near a sink or heating vent, and recommends keeping them inside a cupboard or drawer. University of Florida IFAS Extension says to keep them in a cool, dry place in tight containers away from heat, and to keep the container away from steaming pots when you cook.
That changes where the pull-out goes. In the plan above, the spice cabinet sits two doors from the range and across the aisle from the dishwasher, not beside either. If your layout leaves only the cabinet next to the range, use it for the jars you refill every week and keep backups in a cooler cabinet.
Measure the Cabinet Properly
Standard base cabinets are about 34.5 inches tall and 24 inches deep, according to common cabinet size guides, but old kitchens vary. Measure yours rather than assuming.
- Interior width: measure between the inside faces of the cabinet box, not the door.
- Usable depth: measure from the back wall to the inside of the door or face frame, because the tray must clear them when it closes.
- Opening width: the door opening can be narrower than the box, which limits the tray width.
- Obstacles: note water lines, drain pipes, outlets and dishwasher hoses, especially near a sink.
- Shelf positions: decide whether to remove the fixed shelf, which is usually where the tray goes.
Write the numbers down. A sketch on graph paper catches clearance problems before you buy hardware or cut a board.
Choose Slides That Match the Cabinet
A pull-out tray lives or dies by its slides. Look for full-extension slides so the whole tray comes out of the cabinet, and a load rating comfortably above the weight of a full tray. Small spice jars are light, but thirty of them plus a wooden tray add up, so check the rating on the spec sheet instead of guessing.
Read the spec sheet for two more numbers: the side clearance the slide needs and the slide length. Many side-mount slides need about half an inch on each side, which is why the tray ends up an inch narrower than the cabinet interior. For length, choose the longest slide that clears the door and face frame; for a 24-inch-deep cabinet that is often in the 18 to 22 inch range. A very short slide, such as 10 inches, would let the tray open only part of the way, so the back jars would stay out of reach.
Design the Tray and the Riser
The most useful design is a shallow tray rather than a tall tower. The tray carries the jars, a low riser lifts the back rows so labels stay visible, and the cabinet door hides everything.
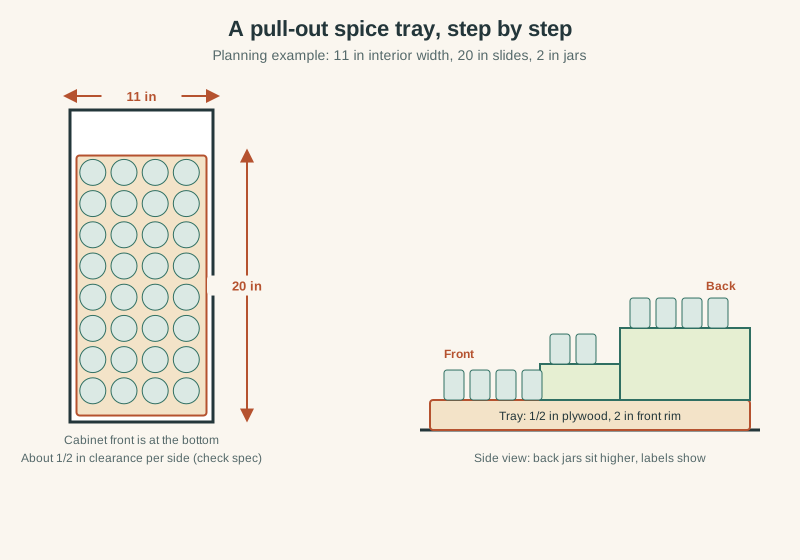
In the planning example above, the cabinet interior is 11 inches wide, the slides need about half an inch per side, and the tray is therefore about 10 inches wide and 20 inches long. Many small spice jars are about 2 inches wide, so that footprint holds roughly four jars across and eight rows deep on a single level. The riser lets you stack rows without hiding labels, so you can store more without losing sight of what is at the back.
Keep a rim of about 2 inches at the front to stop jars from sliding out when you pull, and leave a little space behind the tray for plumbing or the cabinet back.
Materials and a Simple Build
Half-inch plywood is a good choice for the tray: strong, light and thin enough to preserve depth. MDF is smoother to paint but swells when it gets wet, so avoid it next to a sink. Use a thin sheet for the riser steps or stack hardwood strips.
- Cut the tray base to the width and length you calculated, minus clearance for your slides.
- Add a front rim and short side rims, about 2 inches high, with glue and screws.
- Build the riser from two steps, each about 2 inches high, and glue it to the base from the middle to the back.
- Mount the slides to the cabinet sides first, level and parallel, following the manufacturer’s template and screw positions.
- Attach the tray to the slide halves, test the glide, and adjust until it runs smoothly without binding.
- Finish the wood with water-based paint or a clear sealer so it can be wiped clean.
If you are not comfortable cutting and mounting hardware, a ready-made pull-out insert with a slide kit works the same way. Check that it fits your cabinet interior and uses full-extension slides.
Fill the Tray by How Often You Use It
The best layout follows your cooking, not the alphabet. Put the jars you reach for every day at the front, the ones you use weekly in the middle, and backups and baking spices at the back.
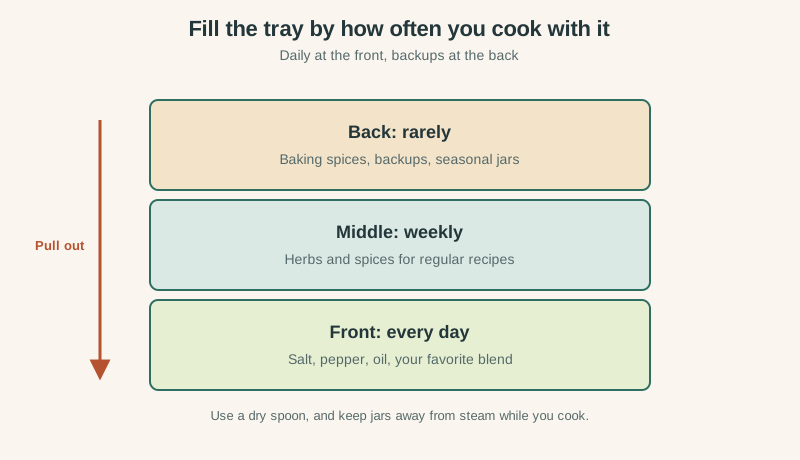
Use jars with tight-fitting lids, label the lid so you can read it from above, and keep the heights uniform so the riser works. Scoop with a dry spoon, and avoid sprinkling spices straight from the jar into a steaming pot, which lets moisture into the container.
Use the Rest of the Galley Wisely
A pull-out tray handles one category, and a galley has several. Pots and pans do well in a deep pull-out drawer near the range, as in the cover photo. Utensils can hang from a wall rail, but place it away from the burners: the National Fire Protection Association advises keeping anything that can catch fire, including oven mitts, wooden utensils, food packaging and towels, away from the stovetop.
Use the sink side of the galley for towels and brushes, and keep the counter beside the range clear for hot pans. If the cabinet under the sink is crowded, our under-sink organization guide shows how to pull it apart without hiding the plumbing.
Keep It Working
A tray stays useful only if you maintain it. Wipe it with a damp cloth every month or two, pull it out fully a few times to check the slides, and tighten any loose screws. When you buy a new jar, put it at the back and move the older one forward, so spices are used before they fade.
Review the contents twice a year. Throw away spices that have lost their aroma, and decide whether the jars you never touch deserve a place at the front.
Common Mistakes to Avoid
| Mistake | Why it matters | Better approach |
|---|---|---|
| Using a very short slide | The tray opens only part of the way. | Pick the longest slide that clears the door and face frame. |
| Making the tray too wide | It binds against the cabinet sides. | Subtract the slide clearance from the spec sheet. |
| Choosing the cabinet next to the range or dishwasher | Heat and moisture shorten spice life. | Pick a cabinet two doors away when you can. |
| Ignoring plumbing | Slides or the tray can hit pipes. | Map pipes and hoses before drilling. |
| Overloading the tray | It can exceed the slide rating. | Check the load rating and keep heavy items elsewhere. |
| Blocking the aisle | You lose the work space you started with. | Keep carts and bins clear of the walkway. |
Frequently Asked Questions
How wide is a galley kitchen?
Two standard 24-inch-deep cabinet runs plus a 42 to 48 inch work aisle give about 90 to 96 inches, roughly 7.5 to 8 feet wall to wall. A kitchen closer to five feet wide usually has only one run of cabinets or shallower cabinets, so measure yours before applying any numbers.
Where should spices go in a galley kitchen?
Inside a cabinet or drawer that is cool, dry and dark, and not above or beside heat and moisture sources such as the stove, dishwasher, microwave, refrigerator or sink. In a galley, that often means a cabinet two doors away from the range.
Can I put a pull-out spice rack next to the stove?
It is convenient, but extension guidance advises against storing spices near the stove because of heat and steam. If it is the only cabinet that works, keep only the jars you use every week there and store backups elsewhere.
What slide length do I need for a 24-inch-deep cabinet?
Choose the longest full-extension slide that clears the door and face frame, often in the 18 to 22 inch range, and check the hardware’s spec sheet for clearance and load rating before you cut anything.
How do I keep a galley aisle clear?
Keep the floor free of bins and appliances, put any rolling cart only where it leaves the walkway open, and make sure a runner has a non-slip pad so it does not shift or curl.
How do I keep spices fresh?
Use tight-fitting lids, store them away from heat, light and steam, scoop with a dry spoon, and avoid sprinkling directly from the jar into a steaming pot.
Related Kitchen Guides
For the rest of a small kitchen, see our guides to kitchen zones, aisles and cabinets , renter-friendly kitchen storage , magnetic spice storage that needs no drilling and small apartment storage .
Sources
- NKBA Kitchen Planning Guidelines (PDF) : the 42 inch (one cook) and 48 inch (multiple cooks) work aisle and the 36 inch walkway; design guidelines, not building code.
- University of California Cooperative Extension: Add a Little Spice to Your Life : store herbs and spices away from heat, light and moisture, not above the stove, dishwasher, microwave or refrigerator, inside a cupboard or drawer.
- University of Florida IFAS Extension: Shopping for Health, Herbs and Spices : storing spices in a cool, dry place in tight containers, away from heat and steaming pots.
- NFPA: Cooking safety : keeping oven mitts, wooden utensils, food packaging, towels and curtains away from the stovetop.
- Quik Cabinets: Kitchen Cabinet Sizes, Complete Guide to Standard Dimensions : typical base cabinets are 34.5 inches tall and 24 inches deep.
The diagrams are original illustrations made for this guide; the room and cabinet sizes are planning examples. Always check your own measurements and follow the hardware manufacturer’s specifications.
Image Credits
- Cover: AI-generated image via ChatGPT, October 2026.