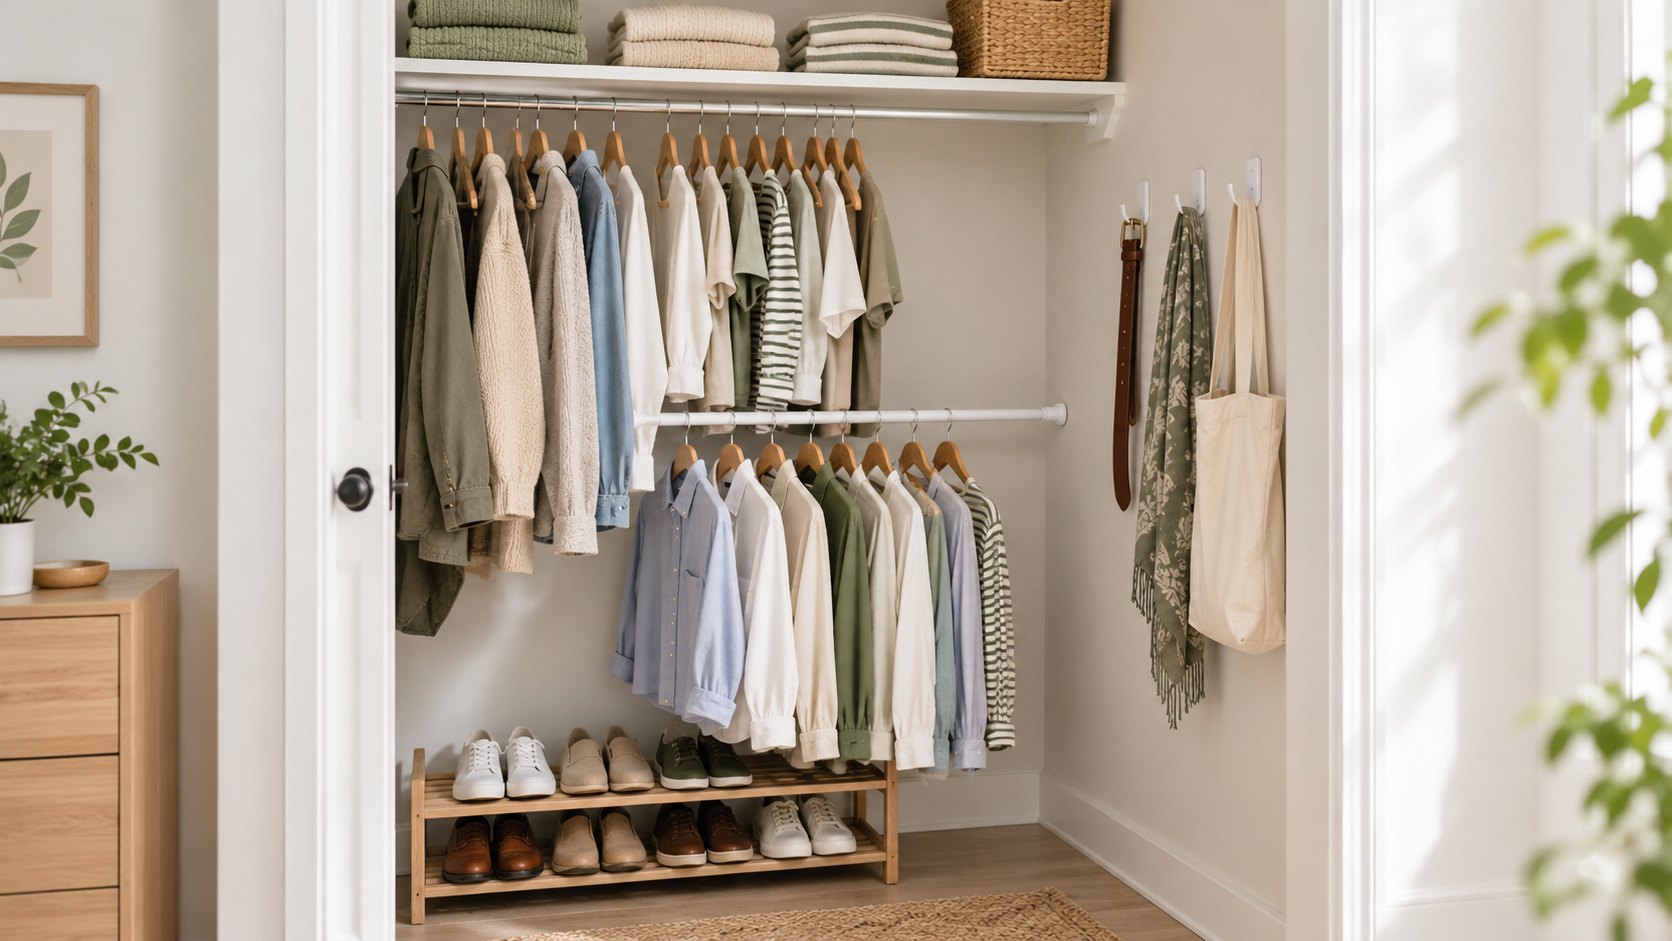
A rental closet can work hard without a single drill hole. The trick is to treat removable hardware as a tool with limits, not a guarantee: adhesive hooks suit light accessories, and a tension rod suits a few lightweight hanging jobs when the heights work. The cover photo shows the finished idea: a second hanging level on a tension rod, three adhesive hooks holding a belt, a scarf and a light tote, folded knits on the shelf and shoes in a low rack.
This guide walks through measuring, choosing and installing the hardware, checking rod heights so nothing collides, and making removal part of the plan so your deposit stays safe.
1. Measure Five Things Before You Buy Anything
Measure the closet at the exact spots where hardware will go, and write the numbers down.
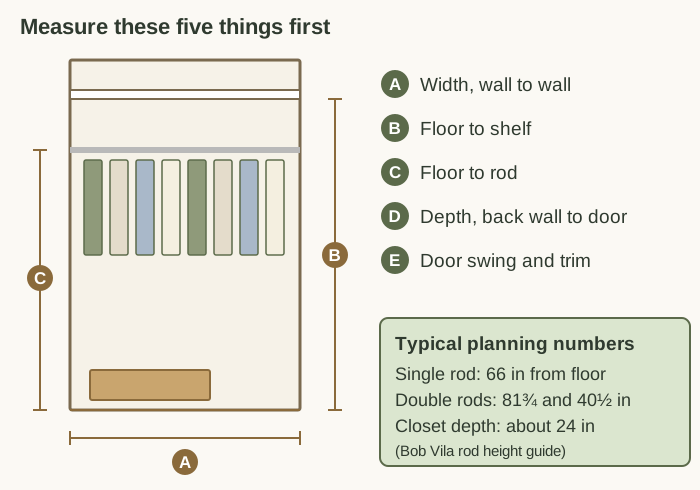
- A. Width, wall to wall, at rod height.
- B. Floor to shelf, the free height under the existing shelf.
- C. Floor to rod, where the current rod sits.
- D. Depth, from the back wall to the door frame.
- E. Door swing and trim, because trim can reduce the usable opening.
Bob Vila’s rod height guide gives useful reference points: a single rod at 66 inches above the floor, a double-rod system with the top rod at 81¾ inches and the lower rod at 40½ inches, and an average closet depth of 24 inches. Your closet may differ, so treat them as comparison numbers, not rules.
Then say the problem in one sentence: “shoes block the floor,” “bags take over the rod,” or “belts and scarves have no home.” That sentence stops you from buying hardware because it looks useful.
2. Choose Adhesive Hooks by Load and Surface
Adhesive hooks work when the product, surface, load and installation all match. Do not assume every removable hook holds the same weight. Read the package for the exact model, and use the lower of the item’s real weight and the hook’s stated limit. A small hook that suits a scarf or a belt is the wrong tool for a loaded handbag.
Surface preparation matters as much as weight. Command’s archived instructions say to wipe the wall with rubbing alcohol and not to use household cleaners or water, and they include a list of suitable surfaces, so check your wall against it. If the finish is unfamiliar, test one hook in a discreet spot before you install several.
3. Install Adhesive Hooks Correctly
Use the instructions for the exact hook you bought. For Command clear hooks, the steps are below.
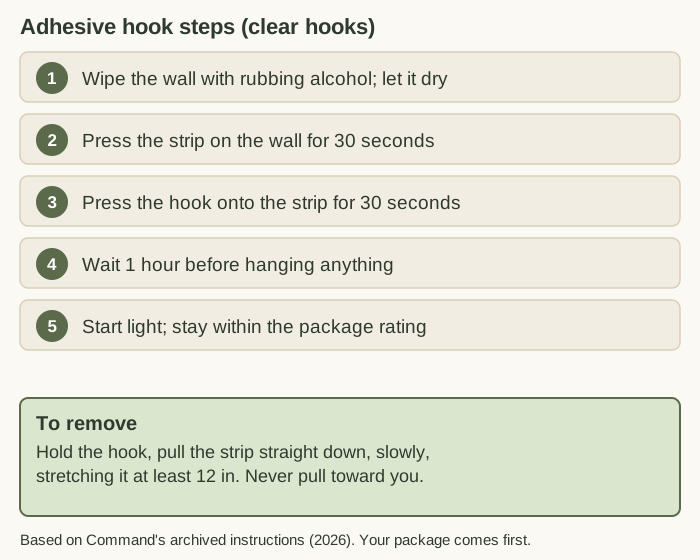
Other Command hooks differ slightly: one-piece hooks also need 1 hour, and two-piece hooks need you to press the base for 30 seconds, slide the hook back on and wait 1 hour. Never improvise a heavier load because several hooks look strong enough. Multiple strips do not automatically create a higher safe load, and the manufacturer may specify a number and configuration.
4. Place Hooks Where Your Hand Already Goes
The hooks in the cover photo sit on the closet’s side wall at chest height. The US ADA Standards describe an unobstructed forward reach of 15 to 48 inches above the floor. Your closet does not have to meet that rule, but it is a good comfort guide for the daily hook row.
- Keep belts, scarves, hats and a light tote within that band.
- Give each hook one category rather than a tangled pile.
- Move seasonal accessories to the shelf instead of loading more hooks.
For small items, a clear pocket organizer only works if its full weight stays within the hook’s rating. Do not turn a light-duty hook into the support for a heavy organizer.
5. Tension Rods: Check the Heights First
A tension rod can create a second hanging level without drilling, but it is still a load-bearing part. Before buying one, compare the heights.
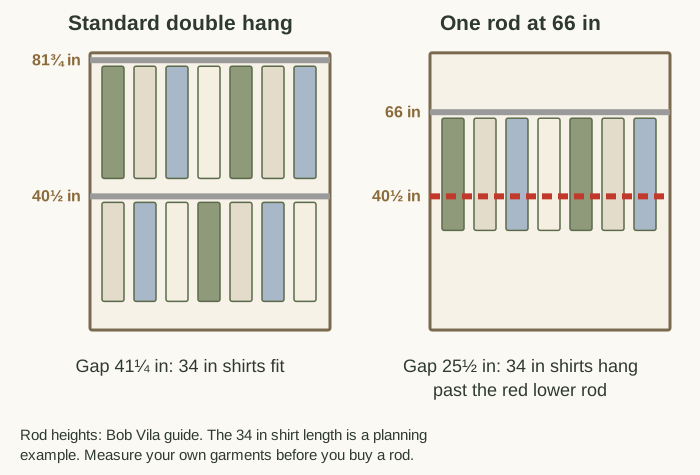
In the standard double-hang layout, the rods are about 41 inches apart, enough for shirts and blouses on top and shorter pieces below. If your only rod sits at 66 inches, a lower rod at 40½ inches is only about 25½ inches below it, so the top garments would hang past it. In that case, a second level only works for short items, such as kids’ clothes or folded-over pants, or you skip it and use the shelf and hooks instead.
To check yours:
- Measure from the top rod down to the hem of your longest top garment.
- The lower rod must sit below that hem with a few inches to spare.
- Make sure the garments on the lower rod still clear the floor or the shoe rack.
For installation, measure the wall-to-wall width at the exact height, confirm the rod’s adjustment range, extend it until it is snug, and test it empty before loading. Over-tightening can mark soft walls, so stop when it holds. Follow the rod’s load rating, and do not use a tension rod as a shelf unless it is designed and rated for that.
6. Plan Four Zones
A closet is easier to keep tidy when each area has one job.
- Shelf: folded knits, a basket for seasonal items, and things used occasionally.
- Hanging zone: everyday shirts, jackets and dresses that need to stay wrinkle-free.
- Hook zone: belt, scarf, hat and a light tote on the side wall.
- Floor: shoes in one controlled place.
Do not create a zone for every object. The goal is fewer decisions, not more labels. Folding knits instead of hanging them also frees hanging space for what really needs it.
7. Keep Shoes From Taking Over the Floor
Start by removing pairs that no longer fit, are damaged beyond repair or are never worn. Then measure what is left.
- A low two-tier slatted rack holds several pairs without blocking the closet.
- One straight row works if the floor depth allows it.
- Occasional shoes can go into low boxes, clean and dry first.
Leave enough floor visible to sweep and to reach the back wall.
8. Test the System in Three Stages
Do not wait until the closet is full to find the weak point.
- Empty test. Check that the rod or hook is stable.
- Light load. Add a few items and watch for movement or slipping.
- Normal load. Add items gradually, and recheck after a day.
If a rod shifts or a hook sags, remove the load, find the cause (surface, length, weight) and fix it before reloading.
9. Protect the Deposit: Plan Removal Now
Removal is part of the system, so learn it before you need it. For Command strips, hold the hook in place, pull the strip straight down slowly, and stretch it at least 12 inches until it releases. Command warns never to pull the strip toward you.
Take a photo of the empty closet before you start and another when you finish. If you are unsure whether adhesives are allowed, check your lease or ask your landlord in writing.
10. Mistakes to Avoid
- Buying before measuring. Hardware that does not fit is the most common waste.
- Overloading light-duty hooks. Respect the package rating.
- Ignoring the surface. Textured or unsuitable finishes are the likely failure point.
- Forcing a second rod into a closet of long garments. Keep the full-height hanging zone instead.
- Skipping the test. Load gradually.
- Forgetting the exit. Know how each piece comes off.
11. A 15-Minute Closet Reset
Once a week, take 15 minutes. Return stray items to their zone, move anything unworn to a bag for donation, straighten the shoe rack, recheck that hooks are still firm and that nothing leans on the rod. A small reset prevents the big overhaul.
12. Plan for Moving Day
Keep the packages and instructions, or a photo of them. When you move out, take the hooks off first, using the straight-down method, then the rod. A closet built from removable parts goes with you to the next rental.
Frequently Asked Questions
Are adhesive hooks safe for rental closets?
They are designed to be removable, but only when used as directed. Command’s instructions call for wiping the wall with rubbing alcohol rather than household cleaners or water, pressing firmly, waiting before use and checking that the surface is on the suitable-surfaces list. Test a discreet spot first if you are unsure.
How long should I wait before hanging something on an adhesive hook?
For Command clear hooks, the instructions say to wait 1 hour after pressing the hook onto the strip. One-piece hooks also need 1 hour, and two-piece hooks need 1 hour after the hook slides back onto its base. Your package instructions take priority.
How much weight can an adhesive hook hold?
It depends on the exact model, so read the package. Use the lower of the item’s real weight and the hook’s rating, and keep hooks for light things such as a belt, a scarf, a hat or a light tote bag.
Can I use a tension rod for a second hanging level?
Sometimes. In a standard double-hang layout the rods sit at about 81¾ and 40½ inches, a gap of about 41 inches. If your only rod is at 66 inches, a rod at 40½ inches leaves about 25½ inches, so it only suits short garments. Measure first and follow the rod’s load rating.
How do I remove adhesive hooks without damaging a rental wall?
Hold the hook in place, pull the strip straight down slowly and stretch it at least 12 inches until it releases. Command warns never to pull the strip toward you.
What should I organize first in a small rental closet?
Measure, then remove what you do not wear, then decide the zones: shelf, hanging, hooks and floor. Install hardware last, once you know what actually needs a home.
Related Storage Guides
If the closet is still too full, our small closet organization guide covers editing and zones, the under-bed storage guide moves seasonal items out of the closet, and the small bedroom storage ideas cover the rest of the room. For the door area, see the entryway drop zone guide .
Sources
- Command (3M), How to use Command hooks and caddies (archived snapshot, May 17, 2026) : wipe the wall with rubbing alcohol, not household cleaners or water; one-piece hooks need 1 hour; pull the strip straight down and stretch it at least 12 inches; never pull toward you.
- Command (3M), How to use Clear Command hooks (archived snapshot, August 19, 2026) : clean with isopropyl rubbing alcohol, press the strip for 30 seconds, press the hook for 30 seconds and wait 1 hour before use.
- Bob Vila, This Is the Perfect Height for a Closet Rod : a single rod at 66 inches, double rods at 81¾ and 40½ inches, and an average closet depth of 24 inches.
- US Access Board, ADA Chapter 3: Operable Parts : the 15 to 48 inch unobstructed forward reach range.
The diagrams are original illustrations made for this guide. Rod heights and the 34 inch shirt length are planning examples, so measure your own closet and follow the manufacturer’s instructions and load ratings for every hook and rod.
Image Credits
- Cover: AI-generated image via ChatGPT, October 2026.