Holiday decorations are used for a few weeks and stored for the rest of the year, which makes them the first thing to take over a small closet. The usual advice is to buy more bins. In an apartment that backfires, because every extra bin needs a place to live. The better order is to count what you own, let your best shelf set the budget and then decide what earns a bin.
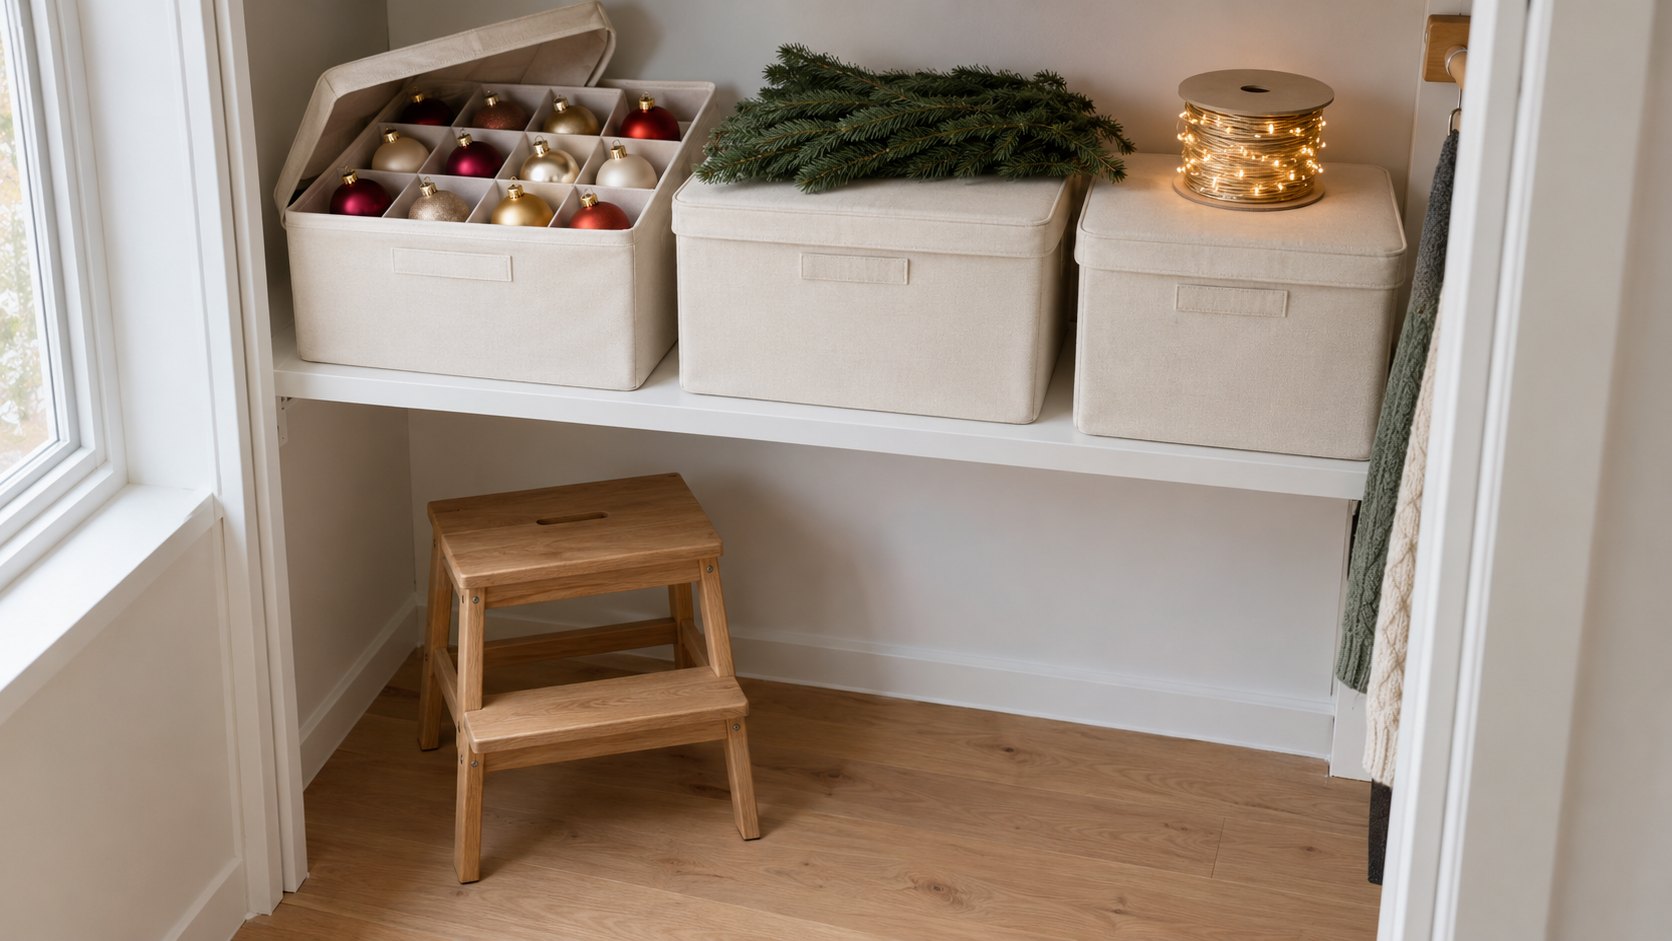
The cover photo shows the result: fabric bins with lids on a closet shelf, one holding ornaments in a divided box, another with a spool of lights and a bundle of greenery on top, and a step stool underneath. This guide shows how to count and edit, turn a shelf into a bin budget, place bins by reach, pack each type safely and keep the system from growing. If you also need to sort the closet itself, see our small closet guide .
1. Count What You Own Before You Buy Bins
Take everything out and sort it into categories on the floor:
- Ornaments and tree toppers.
- Light strings and plug-in decorations.
- Garlands, wreaths and greenery.
- Table, mantel and window decorations.
- Textiles, such as tablecloths, stockings and tree skirts.
- The tree itself, if it is artificial.
- Wrapping supplies.
Count each category, then decide what to keep. University of Kentucky Cooperative Extension notes that putting decorations away is a good moment to declutter, and that is the cheapest storage you will ever find. Discard anything broken, donate duplicates and keep only what you would actually put up this year.
2. Turn a Shelf Into a Bin Budget
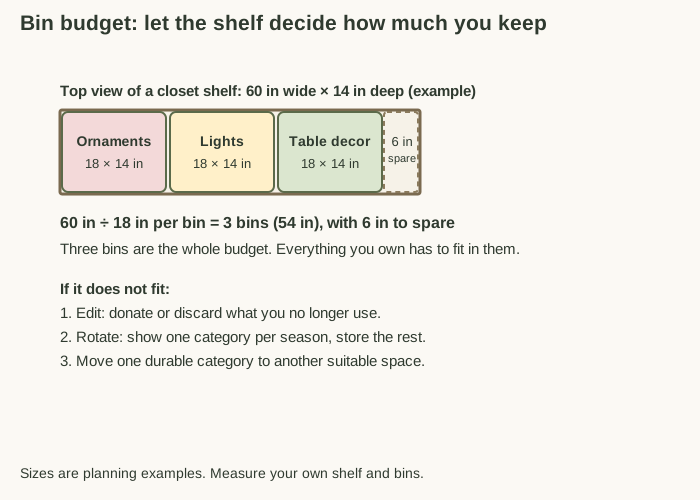
Measure the shelf you plan to use: width, depth and the height between it and the shelf above. Then divide:
- A 60-inch-wide shelf, 14 inches deep, takes three bins that are 18 inches wide and 14 inches deep, with 6 inches left over.
- Three bins, one for ornaments, one for lights and greenery and one for table decorations, are the whole budget.
If your decorations do not fit in three bins, the answer is not a fourth bin. Edit, rotate or move one durable category to another suitable space. Our toy rotation guide uses the same idea of showing one set at a time and storing the rest.
3. Choose One Dry Place Away From Heat
The same extension guidance suggests choosing a dry area away from excessive heat and using the same location every year. In an apartment, the best candidates are:
- A high closet shelf. It is the best fit for light bins you open once a year.
- Under the bed. It suits flat items, such as wrapping paper and table linens, if you have clearance. Our under-bed storage guide shows how to measure it.
- The top of a wardrobe. It works for one or two bins, as long as you can reach them safely.
Public Storage warns that attics, garages and basements often have big temperature and humidity swings, which can damage fragile and vintage ornaments. If your only extra space is a balcony cupboard or a storage unit, keep durable items, such as plastic ornaments, there and keep fragile pieces indoors.
4. Place Bins by Reach
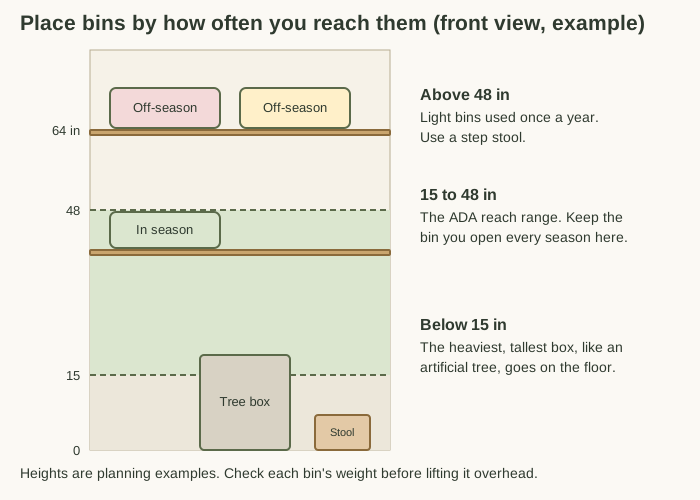
Weight and frequency decide where each bin goes. The ADA guidance gives an unobstructed forward reach range of 15 to 48 inches above the floor, and it makes a useful guide for a closet:
- Above 48 inches: light off-season bins, with a stable step stool.
- 15 to 48 inches: the bin you open every season, so it is easy to lift down.
- Below 15 inches: the heaviest and tallest box, such as an artificial tree.
Check each bin’s weight before lifting it overhead. A bin of glass ornaments is heavier than it looks, and a bin you cannot lift down easily is a bin you will not use.
5. Pack Each Type the Right Way
Different decorations need different packing. These rules come from the extension and storage guidance:
- Ornaments. Use a divided ornament box or wrap each piece in acid-free tissue paper. Keep hooks separate, and do not stack heavy items on top of a fragile bin. Wrap long ornaments in a tube of paper.
- Light strings. Replace burned-out bulbs before you store them, wipe off dust and wind each string around its own piece of cardboard or a spool.
- Garlands and wreaths. Store them flat on top of a bin so nothing crushes them.
- Textiles. Launder washable items before storing them. Dirty linens attract insect pests and can set stains.
- Battery items. Remove the batteries from candles and battery-powered lights before storage so nothing leaks.
Wipe the shelf before the bins go back, because dust and crumbs invite pests.
6. Inspect Lights Before You Use Them
Storage can damage cords, so inspect each string before plugging it in. A U.S. Fire Administration specialist advises checking holiday lights every year before putting them up, and says that open or exposed wiring, fraying or pinching are signs of weakened wiring that can break and overheat. Replace any string with damage, even if it still lights.
Keep a separate bag for the strings that fail the check, and do not put them back in a storage bin. Take that bag to a drop-off point your local waste service accepts for old lights or small electronics, since the rules differ by area. That way you inspect once and decide once.
7. Label the Bins and Keep a Short List
A label on the top and one on the end that faces out saves lifting the wrong bin down. Use the category name, such as Ornaments or Table decor, and add Fragile where it applies. Then take a quick photo of each bin’s contents and keep the photos in one album, so you can see what you own without opening anything.
8. Run the Yearly Cycle
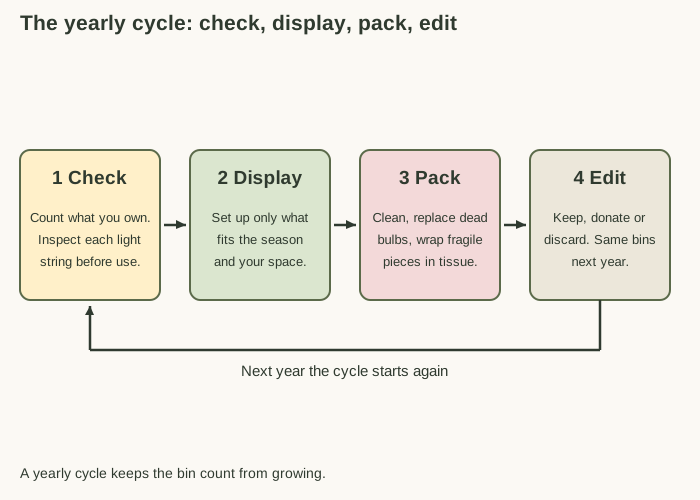
The system only works if it repeats. Each year, check, display, pack and edit:
- Check what you own and inspect the lights.
- Display only what fits your season and your space.
- Pack clean items in the same bins, with dead bulbs replaced.
- Edit by keeping, donating or discarding before the bins go back.
Our decluttering guide has a simple one-in, one-out routine you can use for the edit step.
9. Common Mistakes in Small-Space Holiday Storage
- Buying bins before counting. The bins then decide how much you keep.
- Putting fragile ornaments in the garage or attic. Temperature and humidity swings can damage them.
- Storing the heaviest bin on the top shelf. Weight belongs low.
- Tossing lights in loosely. A tangled string is a string you will not inspect.
- Skipping the edit. Without it the budget grows every year.
- Using the closet’s only reachable shelf. Keep the best shelf for what you use every week.
10. Try This Weekend
Pull everything out, count each category and measure your best shelf. Divide the shelf by your bin width, then edit until your decorations fit that number of bins. Pack the first bin carefully, label it and put it on the shelf. If it feels like work, pick the smallest category first: lights are the quickest win.
Frequently Asked Questions
How many bins do I need for holiday decorations?
Let your storage space decide, not your decorations. Divide the width of your best shelf by the width of your bin: a 60-inch shelf holds three 18-inch bins with 6 inches to spare. Everything you own has to fit in those bins, so edit or rotate whatever does not.
Where should I store holiday decorations in a small apartment?
Choose one dry place away from excessive heat and use it every year. A high closet shelf is a good fit for light off-season bins, and the heaviest item, such as an artificial tree box, belongs at floor level. Keep fragile ornaments indoors rather than in an attic or garage.
How do I store Christmas ornaments so they do not break?
Use a divided ornament box or wrap each ornament in acid-free tissue paper, keep hooks separate from the ornaments and never stack heavy items on top. Wrap long ornaments around a paper tube or inside one, and keep valuable glass pieces indoors where temperature and humidity change less.
Should I check Christmas lights before storing or before using them?
Both. Before storing, replace burned-out bulbs and wipe off dust. Before using them again, inspect each string: open or exposed wiring, fraying or pinching are signs of weakened wiring that can overheat, so replace damaged strings instead of using them.
How do I keep Christmas lights from tangling?
Wind each string around its own piece of cardboard or a spool and secure the plug end so it does not unravel. One strand per spool is slower to pack but much faster to unpack.
How do I stop holiday decorations from growing every year?
Treat the bins as a fixed budget. At the end of each season, keep what you used, donate what you did not and add something new only after removing something old. A yearly cycle of check, display, pack and edit keeps the count steady.
Sources
- University of Kentucky Cooperative Extension, Storing Holiday Decorations : clean and organize decorations, replace burned-out bulbs, wrap delicate items in tissue, store them in a dry area away from excessive heat, use the same location every year and use the moment to declutter.
- Public Storage, How To Store Fragile Christmas Ornaments : divided ornament boxes or acid-free tissue, separating hooks from ornaments and keeping fragile pieces out of attics, garages and basements.
- Carolina Country, Decorate Safely This Holiday Season : the U.S. Fire Administration advice to inspect holiday lights each year and to watch for exposed wiring, fraying or pinching.
- US Access Board, ADA Chapter 3: Operable Parts : the 15 to 48 inch unobstructed forward reach range.
The diagrams are original illustrations made for this guide. The ADA guidance applies to specific buildings and is used here only as a comparison number for reach. Shelf sizes, bin sizes and heights are planning examples, so measure your own space and check the weight of each bin before lifting it.
Image Credits
- Cover: AI-generated image via ChatGPT, October 2026.